设置页面
ClassIsland 允许插件在设置窗口注册自定义的设置页面。本文将主要介绍如何创建和注册自定义的设置页面。
创建设置页面
设置页面基于 WPF 内置的页面类型,所以我们需要先创建一个页面。创建好页面之后,更改以下高亮内容,将页面的基类修改为 SettingsPageBase。
<ci:SettingsPageBase
      x:Class="PluginWithSettingsPage.Views.SettingsPages.ExampleSettingsPage"
      xmlns="https://github.com/avaloniaui"
      xmlns:ci="http://classisland.tech/schemas/xaml/core"
      xmlns:x="http://schemas.microsoft.com/winfx/2006/xaml"
      xmlns:mc="http://schemas.openxmlformats.org/markup-compatibility/2006"
      xmlns:d="http://schemas.microsoft.com/expression/blend/2008"
      xmlns:local="clr-namespace:PluginWithSettingsPage.Views.SettingsPages"
      mc:Ignorable="d"
      d:DesignHeight="450" d:DesignWidth="800"
      Title="ExampleSettingsPage">
    <Grid/>
</ci:SettingsPageBase>using ClassIsland.Core.Attributes;
namespace PluginWithSettingsPage.Views.SettingsPages;
public partial class ExampleSettingsPage : SettingsPageBase
{
public ExampleSettingsPage()
{
InitializeComponent();
}
}为了应用主题样式,还要向设置页面添加下方高亮的属性:
<ci:SettingsPageBase x:Class="PluginWithSettingsPage.Views.SettingsPages.ExampleSettingsPage"
      xmlns="https://github.com/avaloniaui"
      xmlns:x="http://schemas.microsoft.com/winfx/2006/xaml"
      xmlns:mc="http://schemas.openxmlformats.org/markup-compatibility/2006"
      xmlns:d="http://schemas.microsoft.com/expression/blend/2008"
      xmlns:local="clr-namespace:PluginWithSettingsPage.Views.SettingsPages"
      xmlns:ci="http://classisland.tech/schemas/xaml/core"
      mc:Ignorable="d"
      d:DesignHeight="450" d:DesignWidth="800"
      Title="ExampleSettingsPage"
      TextElement.Foreground="{DynamicResource MaterialDesignBody}"
      Background="{DynamicResource MaterialDesignPaper}"
      FontFamily="{StaticResource HarmonyOsSans}"
      TextElement.FontWeight="Regular"
      TextElement.FontSize="14"
      TextOptions.TextFormattingMode="Ideal"
      TextOptions.TextRenderingMode="Auto"
      d:DataContext="{d:DesignInstance local:ExampleSettingsPage}">
    <!-- ... -->
</ci:SettingsPageBase>
声明页面信息
此外,为了声明设置页面信息,我们还需要向设置页面的后端代码中添加 SettingsPageInfo 属性:
using ClassIsland.Core.Attributes;

namespace PluginWithSettingsPage.Views.SettingsPages;

[SettingsPageInfo("examples.exampleSettingsPage", "示例设置页面")]
public partial class ExampleSettingsPage : SettingsPageBase
{
    public ExampleSettingsPage()
    {
        InitializeComponent();
    }
}
您可以在 SettingsPageInfo 属性中为设置页面指定图标、类别等信息,例如:
[SettingsPageInfo(
    "examples.exampleSettingsPage",   // 设置页面 id
    "示例设置页面",  // 设置页面名称
    PackIconKind.CogOutline,   // 未选中时设置页面图标
    PackIconKind.Cog,  // 选中时设置页面图标
    SettingsPageCategory.External  // 设置页面类别
)]
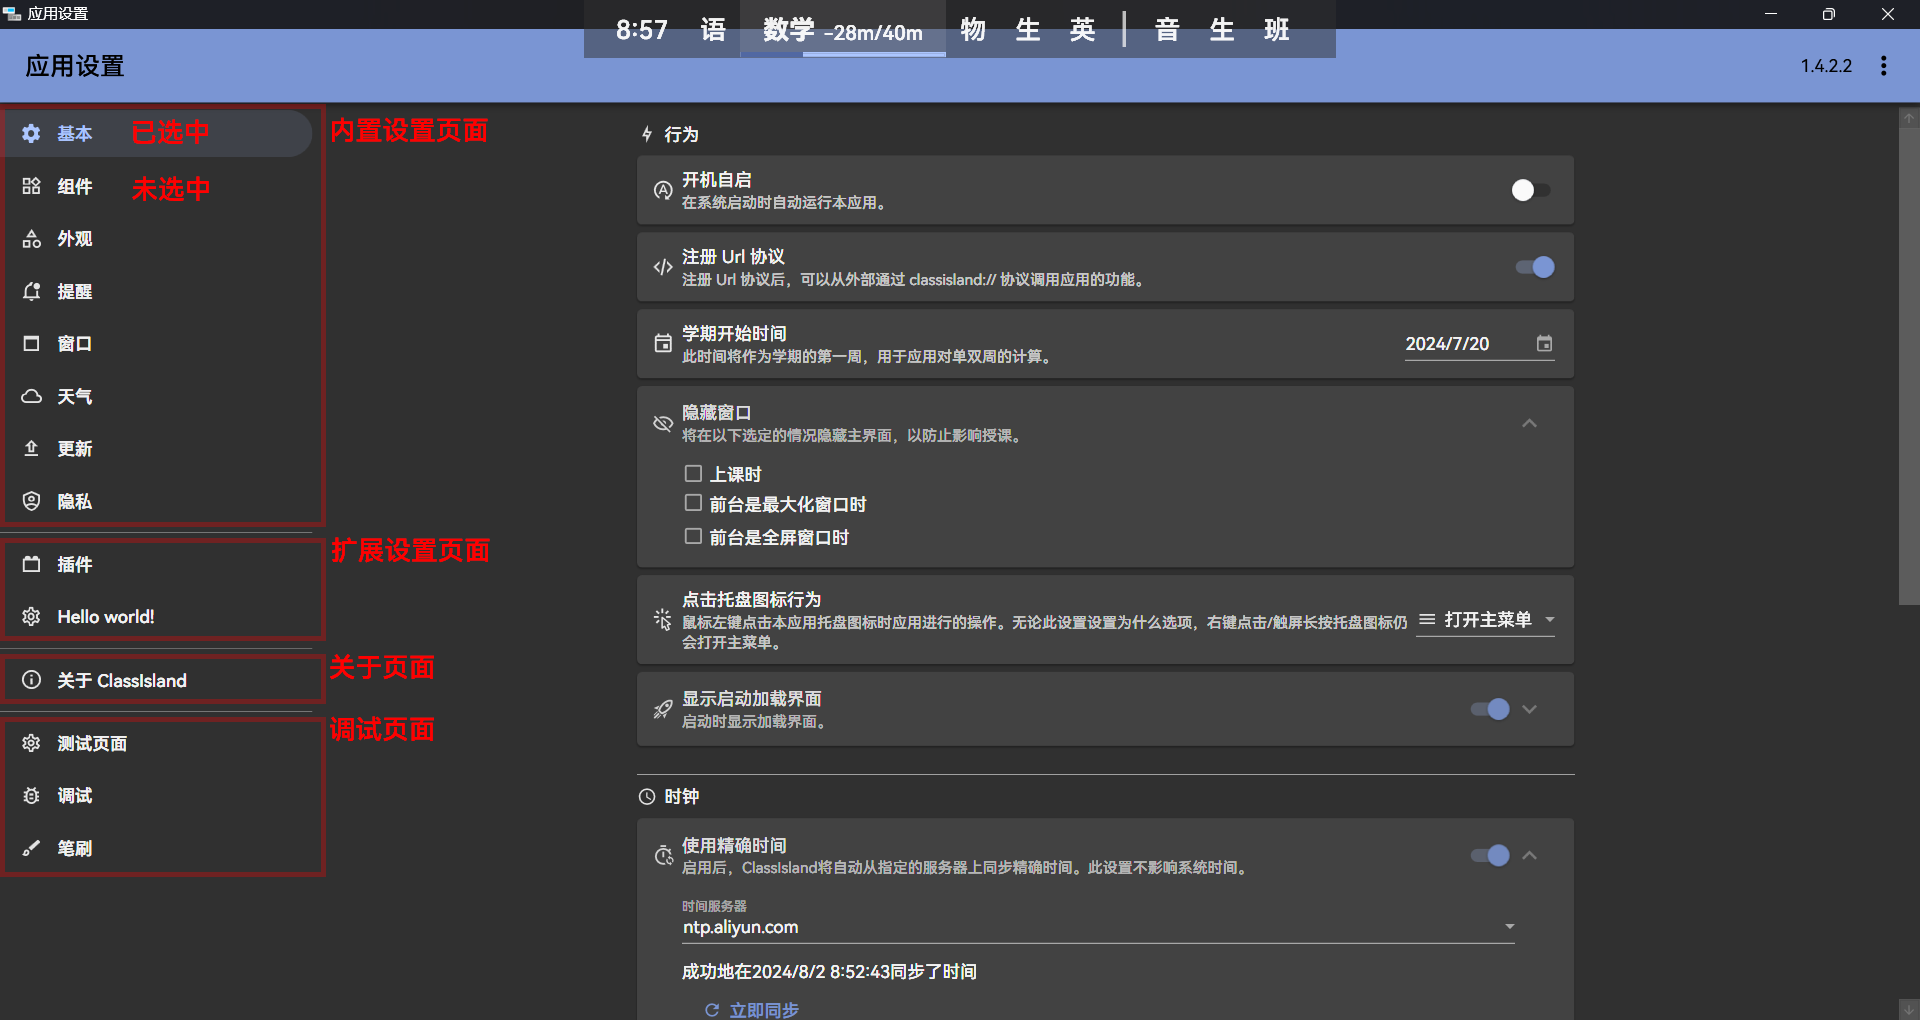
您也可以在 SettingsPageInfo 属性中指定设置页面的类别。不同的设置页面类别的设置页面会在分组后按一定的顺序显示。设置页面具有以下类别:
| 值 | 类别 | 说明 |
|---|---|---|
| SettingsPageCategory.Internal | 内部设置页面 | ClassIsland 内置的设置页面,不建议插件注册的设置页面使用此类别。 |
| SettingsPageCategory.External | 扩展设置页面 | 一般用于插件注册设置页面。 |
| SettingsPageCategory.About | 关于页面 | 显示关于信息的设置页面。 |
| SettingsPageCategory.Debug | 调试页面 | 用于调试的页面,当调试菜单关闭时,不会显示这些界面。 |
这些类别在设置界面上显示的位置如下示意图所示:

注册设置页面
编写完设置界面之后,还需要在初始化方法中把设置页面注册到应用上。
注册完成后,打开【应用设置】,您可以在设置界面的导航栏中看到您注册的设置页面。
您可以查看设置界面示例项目来了解更多信息。